Is your parking lot looking a little worse for wear? It happens. Exposure to UV rays, wind, water, and both foot and vehicle traffic slowly erases your parking lot lines.
Eventually, you’re left with faded lines that are mere ghosts of what they once were, and your parking lot looks old and poorly maintained. Worse, without bright, clearly visible lines, your parking lot could be a hazard for visitors.
The good news is that parking lot striping is a relatively simple task that really only requires the right tools, the right paint, and a little bit of time. In our complete guide, we’ll explore how to paint parking lot lines, tips and tricks to help you through, equipment that you’ll need, and more.
Why Parking Lot Striping Matters
Why do parking lot lines matter? Well, there are a few reasons:
- Navigability: First, parking lot lines help visitors navigate the area, from parking aisles to travel lanes, loading/unloading zones, handicap-accessible parking spaces, and more.
- Safety: Parking lot stripes play a big role in property safety. Things like crosswalks, speed limits, speed bump warnings, and the like go a long way toward protecting the people who use your parking lot every day.
- Legal Compliance: Finally, your local municipality probably has some parking lot line requirements, and if you don’t meet them, you could face fines or other penalties.
- Curb Appeal: Faded lines make your parking lot look old, dingy, and poorly maintained. Striping a parking lot refreshes your property without the cost of new pavement.
Now that you know why parking lot striping matters, let’s take a closer look at how to paint parking lot lines and what you’ll need to do the job.
SHOP RELATED PRODUCTS
How to Paint Parking Lot Lines
You can go about parking lot striping in one of two ways:
- Manual: If you really want a low-tech option, you can use a four-inch paint roller and a bucket of paint. You’ll need to chalk the lines first so you have a guide. Make sure you’re using high-quality, professional-grade paint. If you want to go this route, you’ll need the following:
- A chalk line
- A measuring tape
- A supply of paint
- A four-inch paint roller (and replacement rollers)
- Parking lot stencils
- Cones or caution tape
- Machines: Not loving the idea of all that back-breaking manual labor? We don’t blame you. It’s a better option to use a parking lot line machine. The lines are straighter, the paint is applied evenly, and you don’t have to spend days bent over with a paint roller. If you want to take this path, you’ll need:
- An asphalt striping machine (also called striping machines or line stripers)
- A supply of paint (buckets for some machines or spray cans for others)
- Cones/tape for safety
Note that line stripers vary a lot in terms of how they work. Make sure you know what type you need and how to use it.
SHOP RELATED PRODUCTS
LEARN MORE: ENROLL IN OUR FREE COURSE
Free Line Striping Email Course
Register Now
Discover how easy it is to save money by striping your parking areas yourself.
Choosing Your Parking Lot Line Striping Machine
You’ll find a wide range of tools out there designed to help you with striping a parking lot. The problem is that they’re not created equal. Here’s a quick guide to choosing the right striping machine for your needs (lot size, budget, etc.).
If you’re only painting your lot once in a while, a basic striper that uses aerosol cans may be enough. For regular projects, airless sprayers are lighter. They’re also easier to use, and they draw directly from paint buckets. That said, replacement parts can be more expensive.
If stenciling is part of your work (arrows, handicap logos, numbers, etc.), look for a machine with a detachable spray gun. Some models even have a two-gun configuration, letting you stencil faster and paint double-wide lines in one pass. Without a spray gun, you’ll have to paint your stencils by hand.
Beyond daily use, you have some other considerations. What kind of warranty does the sprayer come with? How widely available are replacement parts? A strong warranty shows the manufacturer stands behind their product. Quick access to parts is important because waiting weeks for replacements is unacceptable. And if you expect to grow into larger projects, choose a machine that supports add-ons like a ride-behind seat.
SHOP RELATED PRODUCTS
Parking Lot Striping: Understanding Lines and Paint Colors
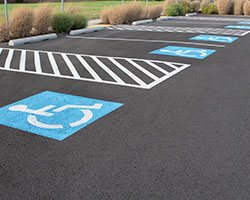
When it comes to striping a parking lot, you need to know a few things about the lines themselves and the paint colors that you’ll use. In most cases, you’ll need three colors: white, yellow, and blue.
- White: You’ll use white for a wide range of line types, from parking spot lines to crosswalks.
- Yellow: Yellow can be used for crosswalks and no-parking zones, as well as for other purposes. It’s a good choice if you want visitors to exercise caution while driving or walking in the area.
- Blue: Blue is usually used for handicap accessible parking spots, but it can play a role in other areas, too.
Make sure you know the parking lot striping rules and regulations that apply to your specific property.
Paint type matters when it comes to parking lot striping. You’ll find two types on offer: solvent-based paint and water-based paint. Do not try to use acrylic or latex paint because they won’t adhere to the asphalt. Both water and solvent-based paints can work very well, but make sure that you get traffic pain
Parking Lot Line Striping: Getting Started
Striping a parking lot isn’t rocket science, but it does require that you go into it with a strategy that will guide you from beginning to end. We’ve broken down the parking lot line striping steps for you to follow below.
Step 1: Evaluate & Plan the Layout
You have to start with a solid plan. Begin by mapping out your lot:
- Measure everything. Standard spaces are around 18 feet long and 9 feet wide, with about a 24-foot-wide driving lane between rows. Note that this can and will vary depending on a lot of factors, like:
- One or two-way traffic aisles
- Parking spot size (passenger vehicles vs. RVs, for instance)
- Parking lot size
- Local rules and laws
- Know the ADA requirements that apply to your business. Map handicap-accessible stalls with the right signage and size.
- Sketch a layout. Whether it’s directional arrows, loading zones, or fire lanes, decide exactly where everything goes, preferably on paper or chalk-marked on site.
- Plan for traffic flow. Make sure that cars can enter, park, and exit easily. Directional arrows help, too.
Step 2: Clean and Prep the Surface
A bad surface equates to a bad paint job. Here’s how to prep your lot properly:
- Sweep or power wash first. Get rid of dirt, debris, or vegetation, because paint won’t stick otherwise.
- Fix cracks and potholes before you go any further. Any uneven spots can wreck your lines later.
- Let it dry. Moisture will affect how the paint applies and cures. Note that this also means you need to pay attention to the weather (rain, humidity levels, etc.) during and immediately after the project.
- Tape or chalk outline if needed. This helps with consistency (although a line striping machine can eliminate this step).
Step 3: Gather Your Tools
We covered this in greater depth earlier in this guide. In addition to your paint (make sure you have traffic paint), paint roller, or line striping machine, you’ll need the following:
- Chalk line and measuring tape to mark your lines (if doing it manually).
- Reflective beads to improve visibility, especially at night, in the rain, when it’s foggy, etc.
- Stencils for symbols like handicap logos, arrows, or words.
- Safety gear, like cones, caution tape, gloves, goggles, and masks (especially if you’re using solvent-based paint
Step 4: How to Paint Parking Lot Lines (Step-by-Step)
Here’s where the fun begins:
- Start early. Cooler temps help paint set better and last longer.
- Stripe systematically. Work one section at a time and don’t rush.
- Use a line striper if you can. Hold the trigger, walk at a steady pace, and let the machine do the heavy lifting.
- If your machine has a front-wheel lock or laser guide, use it. It’ll keep your lines cleaner.
- Hand-paint for stencils or symbols. Use your stencils and apply paint carefully.
- Broadcast reflective beads if you’re using them. Do this immediately after painting for maximum adhesion.
Step 5: Drying & Clean-Up
Your job doesn’t end when the painting does.
- Keep traffic off the lines until they’re fully dry. Use cones, tape, or signs to warn people away from the paint.
- Clean your equipment:
- For water-based paint, just use water
- For solvent-based paint, use the appropriate solvent
- Inspect your work. Make sure lines are even, crisp, and correctly aligned. Touch up where needed.
Step 6: Maintenance & When to Repaint
Once your lot’s looking good, you’ll wanna keep it that way:
- Repaint every one to two years, depending on traffic and climate. High-use lots or harsh weather will probably mean more frequent refreshes.
- Clean the lot regularly to prevent debris from degrading your paint.
- Sealcoat before repainting. Sealcoating can black out old lines, so it’s smart to plan striping right after applying a fresh sealcoating.
Step 7: Extras to Consider
Here’s how to level up your striping game:
- Use package deals. Asphalt Kingdom offers line striping packages that include machine, paint, stencils, and more.
- Think about business potential. Offer striping services to local clients; there’s real profit in this.
- Take a course. Our free 6-part line striping course can get you up to speed fast.
LEARN MORE: ENROLL IN OUR FREE COURSE
Free Line Striping Email Course
Register Now
Discover how easy it is to save money by striping your parking areas yourself.
SHOP RELATED PRODUCTS
Get Started Striping Your Parking Lot
Whether you’re planning a DIY parking lot striping project or planning to open your own asphalt maintenance business, Asphalt Kingdom has the tools and supplies that you need. Get in touch to learn more or download our free business blueprint kit.
LEARN MORE: ENROLL IN OUR FREE COURSE
Free Line Striping Email Course
Register Now
Discover how easy it is to save money by striping your parking areas yourself.
SHOP RELATED PRODUCTS
We're Here to Help
If you decide to get into line striping, we're here to help! Call us at 1-866-399-5562 or send us a message if you need help choosing your equipment.


