


Sealcoating Equipment Prep 101: Mixing, Loading, and Priming Sealer Correctly
Learn how to properly prepare your sealcoating equipment for efficient and professional results, ...
.jpg?width=1000&name=909-1%20(1).jpg "909-1 (1)")


There are two things to consider when purchasing sealcoat sealer: quality and quantity.
 The quality of asphalt sealer is important to how long it lasts and how well it protects. The highest quality sealer is the most effective at protecting against the elements and repelling water, gasoline, oil, and transmission fluid.
Another good quality indication is if the sealer is marked “airport-grade,” which must meet the high standards needed for airport runways. You may not be able to find airport-grade sealer at your local store, but you can find high-grade asphalt/blacktop sealer on our website.
Emulsion sealer is generally considered to be of a lesser quality as it, among other weaknesses, fades faster, is more susceptible to stains, and requires warmer temperatures for proper application.
As for quantity, you must measure the area where you plan to apply sealant. Simply multiply the length by the width for the square footage. If you have multiple areas, measure each one individually and add them together. Enter this number, as well as how you plan to apply the sealer, into our sealcoating calculator, and you’ll know exactly how much you’ll need. Remember, it’s better to have too much than have to stop and order more before you're finished.
Keep in mind If you have neglected asphalt sealing for many years, you will need to apply it in two thin coats, allowing time to dry in between, so you’ll need to double up on your order.
 Do you need a sealcoating machine, and do you know how to choose one? For any property manager or owner, an asphalt sprayer is an investment that quickly pays for itself in time and money saved.
When you figure that you should sealcoat every two years, doing it yourself is a big savings over contracting the job out. On anything but a small driveway, using a broom or squeegee in lieu of a sealcoating machine is not a good use of time, and it is very hard work.
It's not only faster to use a machine but also more efficient. A sealcoating machine uses 40% less material than manually-applied sealer. If you have asphalt equipment such as the AirBoss 300 Air-Operated Sealcoat Spray System, you will be saved from spending too much time and effort when you maintain your asphalt parking lot. This equipment should last you many years to come, if well-maintained.
Most sealcoating machines work in roughly the same way, and even the simplest sealcoating machine will make the work simple, quick, and professional looking. For the property that has larger demands, you can go all the way up to a heavy-duty machine that handles up to 300 gallons of sealant in a sealcoat storage tank.
This article will give you the facts you need for finding the best machine for your needs.
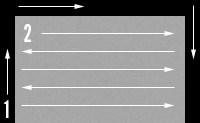 Plan out where you will start and finish, so you don’t paint yourself into a corner. Generally, you start asphalt sealing by doing the top and side edges first, keeping the spray even and applying a thin coat. It’s useful to have a second person work with you, holding cardboard to protect the grass, curb, sidewalks, or flower beds on the edges. Then start at the top and work side to side all the way to the bottom edge.
The quality and efficiency of your sealcoating machine can also be enhanced with the use of accessories. One of the most popular sealcoating accessories is the Sealcoat Edger.
If you've never used a spray shield such as the Wand Wizard Edger before, you're going to be amazed at how much time it saves you. Just attach it to a spray wand and go! You don't need to have another person holding plywood or cardboard so that you don't overspray onto sidewalks, curbs or lawns: this attachment makes it easy for you do it all yourself.

Other useful accessories include filter kits and, for larger or commercial jobs, hose reels.
When using a spraying machine, coat the top and side edges of the designated area first. Then, starting at one of the top corners, go side to side until it's done.
The spray tip on the end of your sealcoat sprayer controls the GPM (gallons per minute) that's applied to the blacktop as well as its shape. Not all spray tips are the same, though, as varieties will create different shapes. Spray tips with fewer GPMs will apply thinner streams for better control on smaller surfaces, while those with greater GPMs will spray wider fans with less precision.
Be sure to have a variety of spray tips on the job to get the right coverage in the right spots.
If you start getting poor pressure at the spray tip while you're sealcoating, there are a few potential causes. Get three common reasons and how to fix this problem with some troubleshooting.

In order to keep your sprayer in good working condition, it’s important to clean and maintain the hose, sprayer gun, sprayer tips, and filter on your sealcoat system.
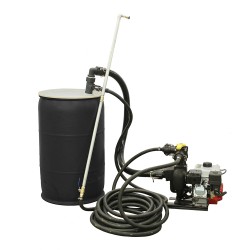
When you are done with work for the day, you should flush your hose and spray gun. To do this, you should have a 55-gallon drum of water (highly recommended, though you can also use a large 30-gallon bucket or other large container of water as your water source) and a transfer kit.
We strongly recommend you buy a transfer kit if you don’t already have one. It’s not only useful to transfer sealer from drums or other sealer sources, but it also allows you to flush your unit very well.
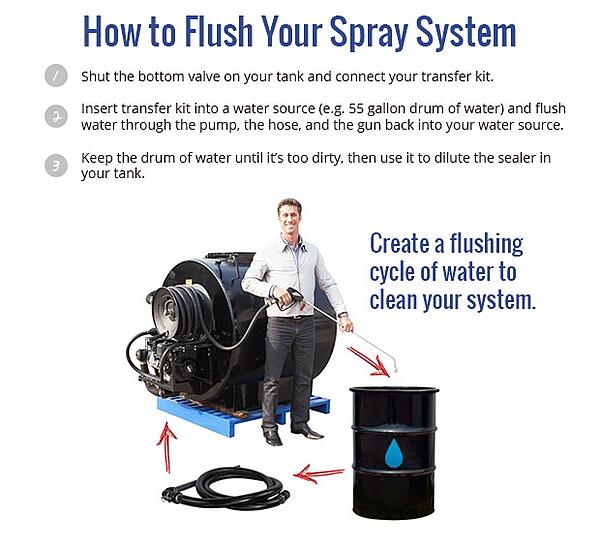
When you’re ready to flush your system, turn off the bottom valve at the very bottom of your tank. This shuts the tank, so you won’t be pulling sealer through your sprayer hose and spray gun. Connect your transfer kit to the female camlock, and fill the transfer kit hose with water. Insert the end of the transfer kit into your water source and point your spray gun into your water source as well. Then, turn your unit on spray mode on top of your pump. Your system will be pulling in water via the transfer kit, through your pump, down your spray hose, through your spray gun, and back into the water source.
This essentially flushes your unit with water. See the diagram below:
Once you’re done with the flush of water, remove the screen mesh of the filter kit and stick it into a 5-gallon pail of water for an hour or two. The filter kit itself opens up nice and wide, so you can get a hose in there and flush it out for 20-30 minutes. When you’re ready to use your unit, reassemble.
Take your tip off the spray gun, and put it into a small Tupperware of Goof Off, bug & tar remover, or even water. Use a small wire brush to clean the tip. A stiff wire bristle can clean the tip hole. You can also use a tip basket to soak your sealcoating tips in a container of water and lift them out easily.
Never put the sealer water out into a sewer or dump it out! The best thing to do is just keep the 55-gallon drum of water throughout the season to flush your system. When your water gets very dirty, use that water as dilution water (our sealer can be diluted up to 20-30% with water) or to restore the liquid that evaporates during the season.
When you’re ready to reuse your unit, make sure the transfer kit is removed and the male camlock is back on where the transfer kit was attached. Open the bottom valve of your tank, recirculate your sealer, and use spray mode as normal.
 Previously, we blogged about troubleshooting sealcoating systems that are losing pressure at the spray tip, with one of the potential causes being a clogged suction port.
Clearly that was an issue for many, as we got questions about the best way for fixing and clearing the suction port. Here's what you need to know about this critical part of sealcoating maintenance.
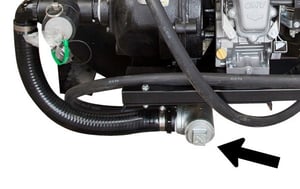
Here is the step-by-step way to clear the suction port by removing the hose:
Prevention is the best sealcoating maintenance. If your sealer is going to sit for a couple of weeks at a time because you are going on a vacation, you are going to have a difficult time agitating the sealer in the tank when you get back. Unless you have someone to come in and agitate it every two or three days while you are away, your real solution is to transfer it.
Start by removing the spray tip off of your spray gun. Then spray the sealer through the spray gun into 55-gallon drums. Seal the drums airtight. This way you protect and prevent your suction port from getting clogged in the first place.
If you've read this resource, you know the two best ways to clearing the suction port in your sealcoating machine. Agitation not only will help clear the blockage by keeping the sealer mixed properly, but by investing in a manual agitation unit and regularly agitating, you prevent the blockages from happening in the first place. Removing the suction hose, with the valve closed, also allows you to remove the sludge that has settled. Most of all, prevention is your best bet. If you will not be using the tank while you are on vacation, either have someone come in every couple of days to agitate it, or transfer the sealant to drums and store.

 Now’s the time to have fresh parking lot lines painted to replace what has been blacked out by sealcoating. We have a great selection of parking lot striping machines, products and a fantastic free line striping course that is just as easy to learn as applying sealer. You’ve already got the asphalt prepped and ready to go, so the time-consuming prep work is already done!
Don’t forget to store your machine and equipment. Keep it clean and ready to use for next time you seal asphalt. The barriers and caution tape can be taken down and stored once the asphalt has cured.
Interested In knowing more? Visit our complete line-up of asphalt courses designed for everyone from homeowners to property managers to business start-ups.
Sealcoating protects and defends your asphalt surfaces and brings their lifespans up into decades rather than years. When you do your own asphalt sealing, you save money and lower the cost of maintaining your property.
Do the simple water test to see if it’s time to apply sealant. Get all cracks and potholes properly patched and filled. Thoroughly clean the surface of all debris, fuel spills, stains, and loose paint. Have enough airport-grade sealer to do the job for the one or two coats you plan on applying. Decide on the right asphalt-sealing equipment for your property. Block off traffic to protect the area, and then apply sealant.
Remember to include line-striping as part of your plan for after the sealer has cured. Now you’re all set to add sealcoating to your list of things you can do yourself—even large projects like small airports—and at a huge cost savings.

Learn how to properly prepare your sealcoating equipment for efficient and professional results, ...

Discover the top tips for choosing your first parking lot line striper. Avoid costly mistakes and ...

Worried about the looming US recession? Here are four reasons why starting an asphalt repair ...
sales@asphaltkingdom.com
Mon–Sat, 8:00am–8:00pm ET
![]()
![]()

